Product New/Edit
How to Access
- Select Extensions → MyMuse→ Products from the drop-down menu of the Joomla! Administrator Panel.
- Click the Products link in the submenu
- Click the New icon in the toolbar.
To edit an existing product, in Product Manager click on a product's Title or click the Product's check box and then click the 'Edit' button. The Add New Product and Edit Product screens have the same functionality.
Description
This is the back-end screen where you can add and edit Products.
Toolbar
At the top you will see the toolbar:

The functions are:
- Save. Saves the article and stays in the current screen.
- Save & Close. Saves the article and closes the current screen.
- Save & New. Saves the article and keeps the editing screen open and ready to create another article.
- Save as Copy: Saves the current article and opens a new one with the same values. The Title will have a number appended. Ex. (2).
- Tracks: Opens the Track List screen.
- Items: Opens the Items List screen.
- Close. Closes the current screen and returns to the previous screen without saving any modifications you may have made.
- Help. Opens this help screen.
Tabs

- Details. The main page for editing the product
- Images. A place to assign a list image and a detail page image.
- Recording Details. Release Date, Producer, Studio, etc.
- Dimensions: Weight and dimensions for a physical product.
- Publishing Details. Start and end publishing.
- Metadata Information.
Details
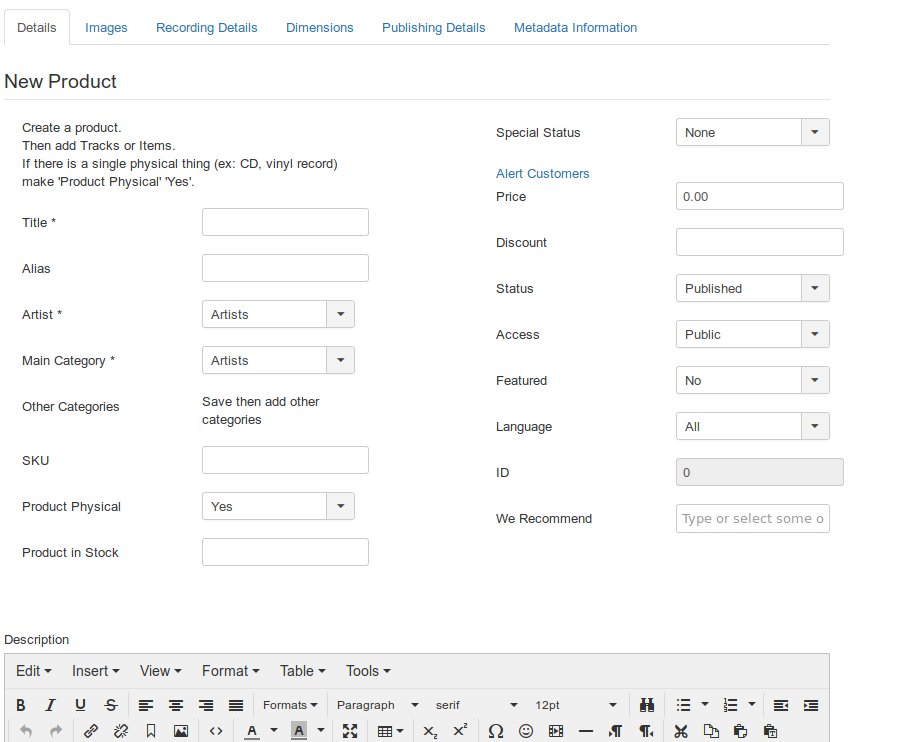
Details
- Title. The Title for this item. This may or may not display on the page, depending on the parameter values you choose.
- Alias. The internal name of the item, also used in the URL when SEF is activated. Normally, you can leave this blank and Joomla! will fill in a default value. The default value is the Title or Name in lower case and with dashes instead of spaces. You may enter the Alias manually. The Alias should consist of lowercase letters and hyphens (-). No blank spaces or underscores are allowed. Non-Latin characters can be allowed in the alias if you set the Unicode Aliases option to Yes in Global Configuration. If this option is set to No and the title includes non-Latin characters, the Alias will default to the current date and time (for example "2019-02-31-17-54-38").
- Artist: Select a category for the Artist
- Main Category. Select the Main Category for this Product from the drop-down list box.
- Other Categories. Assign the product to other categories.
- SKU. a unique store keeping unit for this product.
- Product Physical. Yes/No. If this is a physical product you can ship, or just a placeholder for the files and items under it?
- Product in Stock. How many units of this product do you have? Only necessary if you are using stock controls.
- Special Status: Will override other options.
- None
- Coming Soon: Release date is in the future.
- Pre Order: Release date is in the future but allow sales.
- Out of Stock: When they try to buy show "Out of STock" and stop sale.
- No Longer Available: When they try to buy show "No Longer Available" and stop sale.
- Alert Customers: If there have been pre-sales and the product is now released: email all customers with orders that it is now available.
- Price. The price for this product.
- PRICE BY PRODUCT: If you have set Pricing to "Price by Product" in the store options, you will be able to set prices for each track by format, for an "All Tracks" item and for physical items (if this is a CD or other shippable item).
- Discount. A current discount if any.
- Status.The published status of this item.
- Published: Item is visible in the front end of the site.
- Unpublished: Item is will not be visible to guests in the front end of the site. It may be visible to logged in users who have edit state permission for the item.
- Archived: Item will no longer show on category pages.
- Trashed: Item is deleted from the site but still in the database. It can be permanently deleted from the database with the Empty Trash function in Article Manager.
- Access. Select the viewing access level for this item from the list box. The access levels that display will depend on the what has been set up for this site in Users→Access Levels. Note that access levels are separate from ACL permissions. Access levels control what a user can see. ACL permissions control what actions a user can perform.
- Featured. Yes/No. Select Yes if item will be shown in the Store/Featured menu item. Select No otherwise.
- Language. Select the language for this item. If you are not using the multi-language feature of Joomla, keep the default of 'All'.
- ID. This is a unique identification number for this item assigned automatically by Joomla!. It is used to identify the item internally, and you cannot change this number. When creating a new item, this field displays 0 until you save the new entry, at which point a new ID is assigned to it.
- We Recommend: Select some other products to display in the "Recommended" section of this product's display. In MyMuse Options, "Show Recommends" must be on. This overrides the MyMuse Option "Show Category Recommends", which will recommend products from the same category.
- Description. Enter a description of the product. This may have a "Read More" which will split the description so the top portion shows on the top of the Product's page with a "Read More" link to the bottom of the page.
Images

- List Image: A smaller image for listing pages
- Detail Image: A (usually bigger) image for the product detail page.
- Product Images Folder: Point to a folder under the "images" directory that has a collection of images for the product. This will create Owl Carousel under the main Product Image.
Recording Details
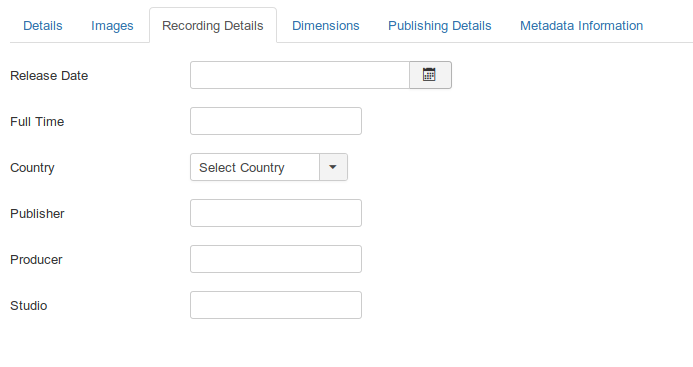
- Release Date: The date the product was released. You can set this in the future for a "Coming Soon" or "Pre-Sale" item.
- Full Time: The full time of the album/product.
- Country: Country it was recoreded in.
- Publisher: Publisher of the album/product.
- Producer: Producer of the album/product.
- Studio: Studio the product was recorded in.
Dimensions
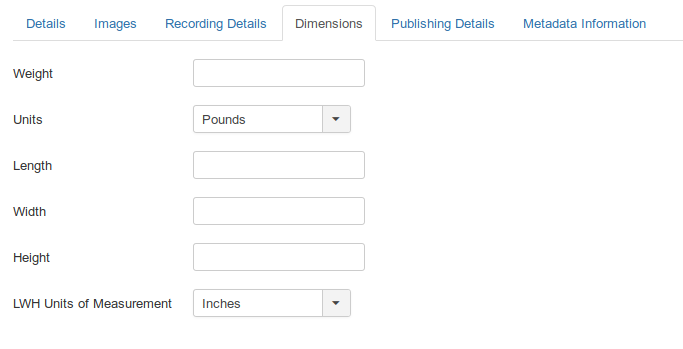
- Weight: Weight of the packaged product.
- Units: Units for the weight.
- Length:
- Width:
- Height:
- LWH Units of Measurement: Units for lenght, width, height.
Publishing Details
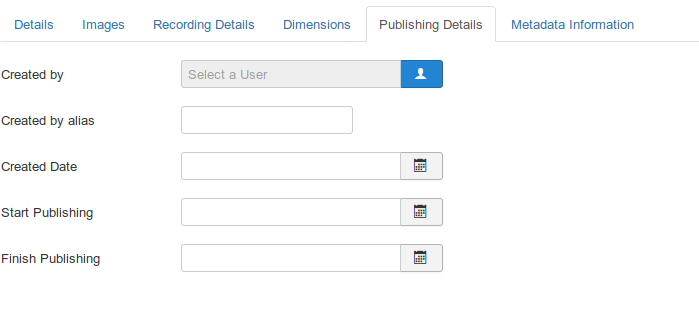
These entries are optional. Joomla! automatically creates default entries for these values.
- Created by. Name of the Joomla! User who created this item. This will default to the currently logged-in user. If you want to change this to a different user, click the Select User button to select a different user.
- Created By Alias. This optional field allows you to enter in an alias for this Author for this Article. This allows you to display a different Author name for this Article.
- Created Date. This field defaults to the current time when the Article was created. You can enter in a different date and time or click on the calendar icon to find the desired date.
- Start Publishing. Date and time to start publishing. Use this field if you want to enter content ahead of time and then have it published automatically at a future time.
- Finish Publishing. Date and time to finish publishing. Use this field if you want to have content automatically changed to Unpublished state at a future time (for example, when it is no longer applicable).
- Modified By. Last modified by this user.
- Modified Date. Date the product was modified.
- Revision. How many modifications have happened.
- Hits. The number of times this product has been viewed.
Metadata Options
This section allows you to enter Metadata Information for this Article. Metadata is information about the Article that is not displayed but is available to Search Engines and other systems to classify the Article. This gives you more control over how the content will be analyzed by these programs. All of these entries are optional. Metadata is shown inside HTML meta elements. The entry screen is shown below:
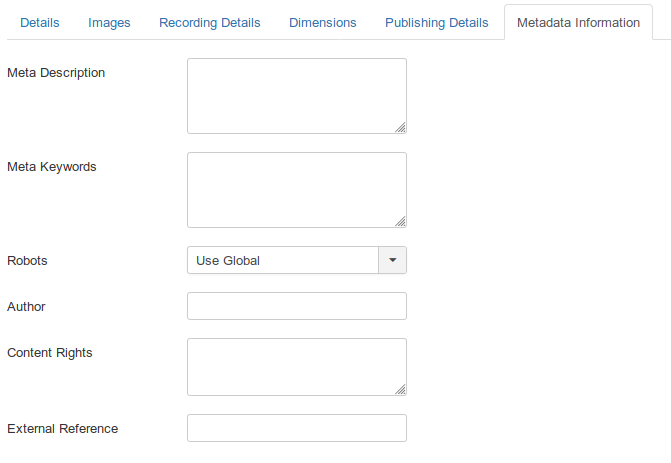
- Meta Description. An optional paragraph to be used as the description of the page in the HTML output. This will generally display in the results of search engines. If entered, this creates an HTML meta element with a name attribute of "description" and a content attribute equal to the entered text.
- Meta Keywords. Optional entry for keywords. Must be entered separated by commas (for example, "cats, dogs, pets") and may be entered in upper or lower case. (For example, "CATS" will match "cats" or "Cats"). Keywords can be used in several ways:
- Robots.The instructions for web "robots" that browse to this page.
- Use Global: Use the value set in the Component→Options for this component.
- Index, Follow: Index this page and follow the links on this page.
- No index, Follow: Do not index this page, but still follow the links on the page. For example, you might do this for a site map page where you want the links to be indexed but you don't want this page to show in search engines.
- Index, No follow: Index this page, but do not follow any links on the page. For example, you might want to do this for an events calendar, where you want the page to show in search engines but you do not want to index each event.
- No index, no follow: Do not index this page or follow any links on the page.
- Author. Optional entry for an Author name within the metadata. If entered, this creates an HTML meta element with the name attribute of "author" and the content attribute as entered here.
- External Reference. An optional reference used to link to external data sources. If entered, this creates an HTML meta element with a name attribute of "xreference" and a content attribute equal to the entered text.
See also:
- Hits: 8956